Sunday, July 20, 2014

Hey y'all! I'M MOVING!

Websites, that is. From here on out, you can find me at michelleydesign.com!

Make sure to update your blog subscription! There's a simple RSS button on the side of my new blog, and you can also use these links to subscribe via Bloglovin' and Feedly. If you use a different program or application, please let me know what it is so I can add a link and make it easier for others!

Can't wait to see you at the new site!!

xx, Michelle

Wednesday, July 2, 2014

Yay for a four-day week (For us Americans, as least, who celebrate July 4th)!! :D As a little celebration of the day off and also for the fact that I hit 200 Instagram followers recently (wee!!), I hosted a little giveaway on my feed. Feel free to throw your hat in the ring - it'll only take you a quick comment for a chance to win these goodies:

Okay, once you've done that, we're going to move on to the next order of business... DIY journals! I've gotta tell you, I just would NOT be able to function without my handy dandy journal/planner. Every single thing I think of gets written down in here, from to-do lists (though I rarely check off every item on the day it's supposed to be done by, whoops), to meal plans for the week, and even my Instagramming schedule (yeah, I'm a little crazy like that). I go through one of these at least two of these every year, and they're with me for so much of my day, so I make a point to differentiate them and make them fun to look at!

As you can see, some of my past notebooks have been really simply covered with some pieces of washi tape and stickers. Super simple, and I'm sure that's an easy idea that you don't need a tutorial for. But my most recent notebook is the one on the right, which I'm going to walk you through today!

This notebook is really unique because I made my own stencil with the exact phrase I wanted. I think "One day at a time" is so appropriate for a daily planner, and is a great reminder to myself not to worry so much, so that's what I went with. Of course, you can choose any phrase you want!

Here's the complete list of supplies you'll need:

  • Custom stencil with phrase of your choice. I cut mine with my Silhouette out of cardstock.
  • Notebooks that are good for DIY covers. I use Moleskine Cahier notebooks, which come in packs of three (so they're a great deal!). I like the gridded pages, because they're good for making my own weekly calendars.
  • Modeling/embossing paste
  • Something to spread the modeling paste with.
  • Embossing powder. I'll be using Ranger Liquid Platinum, which I have to say is my new FAVORITE embossing powder. It melts sooo smooth and beautiful.
  • Heat gun (not pictured)
Once you have all your supplies, the first thing you'll want to do is to position your stencil where you want it on your notebook. I decided to have it read on the long edge, sideways. You can tape it down temporarily with washi tape if you want, but I actually covered the back of mine with spray adhesive so that all the little parts would stay in place better. 

Once you have the positioning right, spread a smooth layer of modeling paste on top. Try not to make it too thick!
Here's how it should look once you take off your stencil - kind of like frosting, mmmm ;)


While it's still wet, shake on a whole lot of embossing powder...
...and shake off the excess.
Okay, now you want to let this dry completely. It'll take at least a few hours. When that's done, then you can heat set it and watch how beautiful the embossing powder becomes. And with the modeling paste under, there's tons of texture, and it won't crack!

Beautiful and shiny :)
Hope you enjoyed this tutorial! Enjoy your short week and the holiday weekend!! :D

Tuesday, June 24, 2014

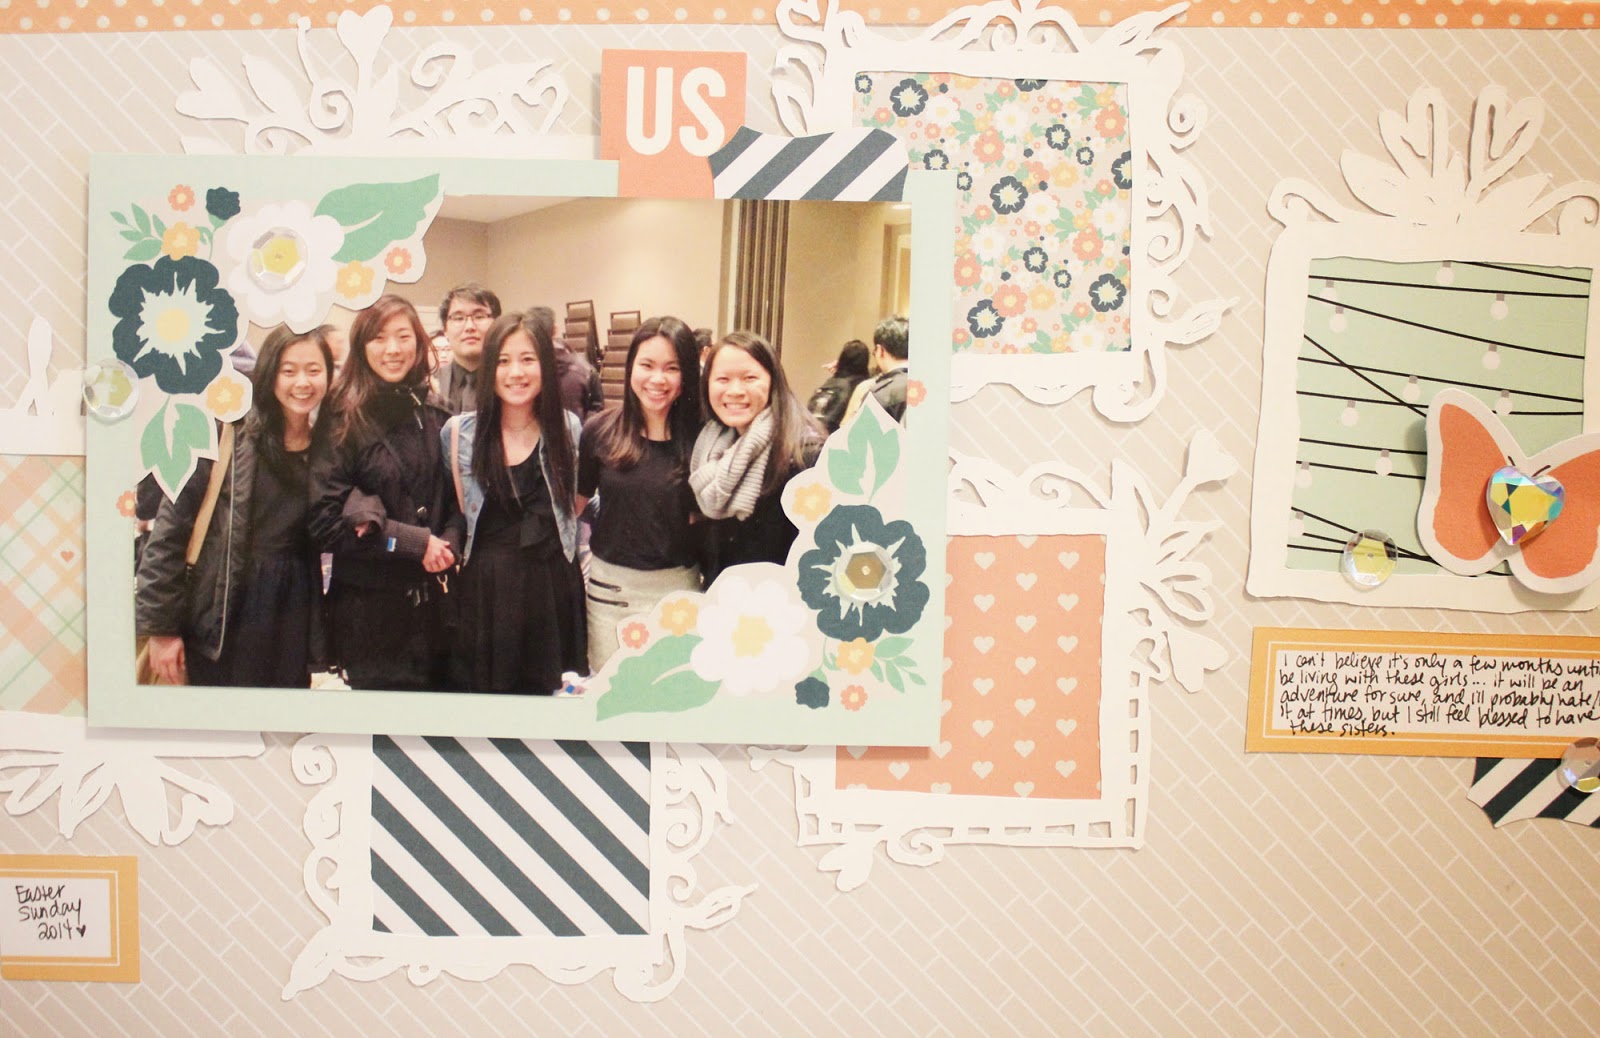
Hello there! Happy Tuesday :) Today I have a quick and easy step-by-step tutorial for you on how to make an interesting background using die cut frames.

To start with, choose a cut file or precut frames - I used these frames with pretty flourishes designed by Wilna Furstenberg for Two Peas in a Bucket. I love the feminine detail these frames have!


Next, choose some patterned papers that you'd like to fill the frames with. It helps to choose paper from a single collection here, so that it will all easily match. A 6x6 pad would be great, but I used this paper from Chickaniddy that has many different patterns that you can cut out. Since I don't do much pocket page scrapbooking anymore, this is a great way to use those cut aparts!


Matching each frame to a patterned paper, I cut a shape to go behind each frame and glued them down.
Then comes the assembling. I decided to do a partial background, but if you wanted to and had enough frames, I think this would be awesome covering a whole layout background.
Tip: Make sure you have parts of your frame going under your photo and even off the page. This creates the illusion that the frames continue behind the object and off the page, like a true background would.

Then you can embellish each frame if you want. I left most of mine empty because I thought the patterned papers and flourishes on the frame were pretty enough :)

I also really love these apartment building motifs in this collection - perfect since this is a layout about my future roomies!!

There is no time other than college where I will be living with FIVE other girls, so I guess I should embrace it and definitely document it :)


Before I finish today, I also wanted to feature a very awesome lady. You might have seen my post a few weeks ago with a tutorial for a Father's Day card - well, Angela saw it on Instagram and actually decided to try it out herself - and added her own little twist to it!
I just LOVE that she added gold to the design - gold just really makes everything better, and it turned out gorgeous! Thanks so much for trying out the card, Angela!! :)

Make sure to visit her on Instagram (@angela.mcleod) to check out more of her awesome work!

Until next time, happy crafting!
xx

Tuesday, June 17, 2014

I've been a very happy girl lately. It's amazing how much good weather can change your mood. I mean, 75 degrees and sunny in Boston? That doesn't happen often, so if you don't enjoy it when it does, you are missing out big time ;)

Recent and future adventures include:
A picnic with my friend Sarah in front of the Museum of Fine Arts

Taking pictures on fire escapes

Seaside photo ops

Nighttime strolls in our beautiful neighborhood

Watching my plants grow :)

Hand lettering outside on campus

Lots of ice cream eating and more picnics to come!

Sorry, I got a little carried away there. I've clearly been taking LOTS of photos recently!!
My real reason for this post is that I wanted to share a card with some SUPER cute new products!!
Just check out that little robot stamp (Lawn Fawn - Beep Boop Birthday) and those teeny tiny flower sequins (from Simon Says Stamp)!! They seriously are the cutest things I've gotten in the mail in a looong time!! I especially love the robot stamps because they would be great for cards for guys, but obviously I made it a little girlier here by adding the flower sequins.
I gave this card to Sarah during our picnic, and I think she really liked it ;) After all, a handmade card during a summer picnic? What's not to love??

Thursday, June 12, 2014

Hi all! Father's Day is only three days away!! It's crazy how these holidays always sneak up on me - it feels like it was just Mother's Day yesterday, doesn't it? If you haven't created a card for your dad yet, follow along with me today as I make a really easy and FUN card! :)


So, the first thing I did was cut out a file that I created on my Silhouette Cameo from some plain white cardstock - you can download the SVG file here. Then, simply write (Best Dad Ever) underneath so you have some personal handwriting on there!


Then, we're going to get started on our watercolor background that's going to go behind the negative space of the die cut.


Very important tip: When watercoloring, if you want to have maximum blending between colors (which is what I want for the ombre-like effect I'm trying to achieve), wet your paper FIRST before adding any color. The whole thing. Just slap it on generously. ;) You'll see a HUGE difference once you start putting on color - it will really start to blend itself. Just look at how easily the colors blend together when you do this!


So just keep going at it, using whatever colors you like. When you're all done with that, let it dry, or use a heat gun to speed up the process.


Now comes the even MORE fun part! We're going to add some more interest to this background, because the spaces under the "BDE" are quite large and we want to make it look cool behind. So we're going to do some watercolor paint splatters! :D Make sure to cover up your workspace under your card front if you care about mess. You can also practice splattering on a separate piece first if you want, but I mean, they're splatters, so they don't have to be perfect, haha.

Tip: When making paint splatters, a medium/large round tipped brush will create the best effects.
So what you're going to do is take a generous amount of water on your round brush and mix it in with the color you want to splatter with.


Flick your brush onto your paper, or hold it horizontally with one hand while tapping from the top with your other hand. If the paint isn't coming off, you can quickly dip your brush into your water and try again...


..And just keep splattering away until you like the result!


Once that's all dry, we just have to assemble the card and we're done! I decided to pop up the front die cut on foam squares because it really makes the negative space pop out. You can just adhere it flat if you don't want to deal with the backings of 20+ foam squares. ;) Then I added some wood veneer little stars to act as periods for the abbreviation of "BDE" - you can use enamel dots, sequins, or even just leave it blank. And here's another look at the final result - those paint splatter just look awesome behind the negative of the die cut!!!


Bonus: Go to Instagram (@michelleyuen_) to see the step-by-step photos in stop-motion form!!! (You'll have to be on a phone to see the video, I believe)

If you decide to recreate this card, let me know how it turns out, and leave a link/photo so I can check it out! Have fun :)

Hi all! Father's Day is only three days away!! It's crazy how these holidays always sneak up on me - it feels like it was just Mother's Day yesterday, doesn't it? If you haven't created a card for your dad yet, follow along with me today as I make a really easy and FUN card! :)


So, the first thing I did was cut out a file that I created on my Silhouette Cameo from some plain white cardstock - you can download the SVG file here. Then, simply write (Best Dad Ever) underneath so you have some personal handwriting on there!


Then, we're going to get started on our watercolor background that's going to go behind the negative space of the die cut.


Very important tip: When watercoloring, if you want to have maximum blending between colors (which is what I want for the ombre-like effect I'm trying to achieve), wet your paper FIRST before adding any color. The whole thing. Just slap it on generously. ;) You'll see a HUGE difference once you start putting on color - it will really start to blend itself. Just look at how easily the colors blend together when you do this!


So just keep going at it, using whatever colors you like. When you're all done with that, let it dry, or use a heat gun to speed up the process.


Now comes the even MORE fun part! We're going to add some more interest to this background, because the spaces under the "BDE" are quite large and we want to make it look cool behind. So we're going to do some watercolor paint splatters! :D Make sure to cover up your workspace under your card front if you care about mess. You can also practice splattering on a separate piece first if you want, but I mean, they're splatters, so they don't have to be perfect, haha.

Tip: When making paint splatters, a medium/large round tipped brush will create the best effects.
So what you're going to do is take a generous amount of water on your round brush and mix it in with the color you want to splatter with.


Flick your brush onto your paper, or hold it horizontally with one hand while tapping from the top with your other hand. If the paint isn't coming off, you can quickly dip your brush into your water and try again...


..And just keep splattering away until you like the result!


Once that's all dry, we just have to assemble the card and we're done! I decided to pop up the front die cut on foam squares because it really makes the negative space pop out. You can just adhere it flat if you don't want to deal with the backings of 20+ foam squares. ;) Then I added some wood veneer little stars to act as periods for the abbreviation of "BDE" - you can use enamel dots, sequins, or even just leave it blank. And here's another look at the final result - those paint splatter just look awesome behind the negative of the die cut!!!


Bonus: Go to Instagram (@michelleyuen_) to see the step-by-step photos in stop-motion form!!! (You'll have to be on a phone to see the video, I believe)

If you decide to recreate this card, let me know how it turns out, and leave a link/photo so I can check it out! Have fun :)

Wednesday, June 11, 2014

It seems like I've been on the hunt for envelopes that are perfect for those of us who make handmade cards. Since I don't use card blanks that come with matching envelopes, I'm always in need of envelopes. Usually, handmade cards have more dimension and require a sturdier envelope than the ones you usually get in bulk. And, after you've spent so much time and effort for a card, don't you want a nice home for it??

I used to handmake envelopes out of my own cardstock, using a stencil, tracing, cutting, and gluing... but it wasn't long before I got sick and tired of this tedious method. Then I bought a pack of envelopes from Amazon, but was very disappointed by the flimsy quality. It seemed that wherever I looked online, most envelopes were the same thickness as printer paper, OR I had to pay an extreme premium for higher quality envelopes. Then, finally, I came across the website that had the perfect solution for me.


Here's a comparison of envelopes off of Amazon and those from CutCardstock.com. It's hard to show in photo, but you can see even from this picture that the top one looks much smoother and more opaque.

Oh, but I also must mention the BEST feature of this website - they send you THREE free samples of whatever you want!!! I tried three different envelopes and found that this one was my favorite, but you can sign up to try some others that look good to you! Isn't that awesome??? :)


The opacity is especially important for me, because I stamp my website on the back of cards I sell, and it just looks bad when you can see the black ink through the envelope!


I'll be using these envelopes from now on for all my handmade cards, whether it be ones I sell or ones that have lots of dimension!

Is there a kind of envelope that you've found to be great for handmade cards? Please share in the comments below - I'd love to check them out and compare! And if you found this post useful, make sure to pin it on Pinterest for future reference! (I know I always need to go back for exact links!)

Wednesday, June 4, 2014

One month since my last post? How did that happen!? Oh yeah, life happened. WHOOPS!

Safe to say, things have certainly not been a bore around here. Many, many things have been happening - both in real life and in my creative/blogosphere world. Hint: This means some BIG things will be announced (hopefully soon), so you'll want to keep an eye out!!

I have to admit, I haven't been scrapbooking much - but I do have one layout I'd like to share with you!


A quick and fun layout with lots of layers. I decided to do some handwritten brushscript and cut it out by hand. Even though I have a Cameo, I love going back to the basics every so often - it's more unique, and also easier when I'm too lazy to design something on my laptop haha ;)


But even though I haven't been scrapbooking much, my creative energies have been put to use in other areas. For example, hand lettering! Once upon a time, I took an intro online course on hand lettering... and never finished anything. But I just loooove the look of it, and this quote has really been on my mind because I'm always brimming with ideas of my future career. So, here's a simple hand lettered piece and hopefully I'll be making more in the future!!


Other than that, I've been making lots of cards also, because I'm constantly inspired by Jennifer McGuire. Make sure to follow me on Instagram for photos of those as well as any other creative endeavors I take on in my never ending adventure of all things crafty, haha!

Also, a quick photo from a gala I recently went to for work. Yes, a shameless mirror-in-the-hotel-room picture but... hey, I don't get to dress up much, and I bought that dress specifically for the event so, whatever - just humor me! Lol :)


In the meantime, I will be working hard for some big projects for my blog. See you soon! :)