Showing posts with label 12x12. Show all posts

Tuesday, June 24, 2014

Hello there! Happy Tuesday :) Today I have a quick and easy step-by-step tutorial for you on how to make an interesting background using die cut frames.

To start with, choose a cut file or precut frames - I used these frames with pretty flourishes designed by Wilna Furstenberg for Two Peas in a Bucket. I love the feminine detail these frames have!


Next, choose some patterned papers that you'd like to fill the frames with. It helps to choose paper from a single collection here, so that it will all easily match. A 6x6 pad would be great, but I used this paper from Chickaniddy that has many different patterns that you can cut out. Since I don't do much pocket page scrapbooking anymore, this is a great way to use those cut aparts!


Matching each frame to a patterned paper, I cut a shape to go behind each frame and glued them down.
Then comes the assembling. I decided to do a partial background, but if you wanted to and had enough frames, I think this would be awesome covering a whole layout background.
Tip: Make sure you have parts of your frame going under your photo and even off the page. This creates the illusion that the frames continue behind the object and off the page, like a true background would.
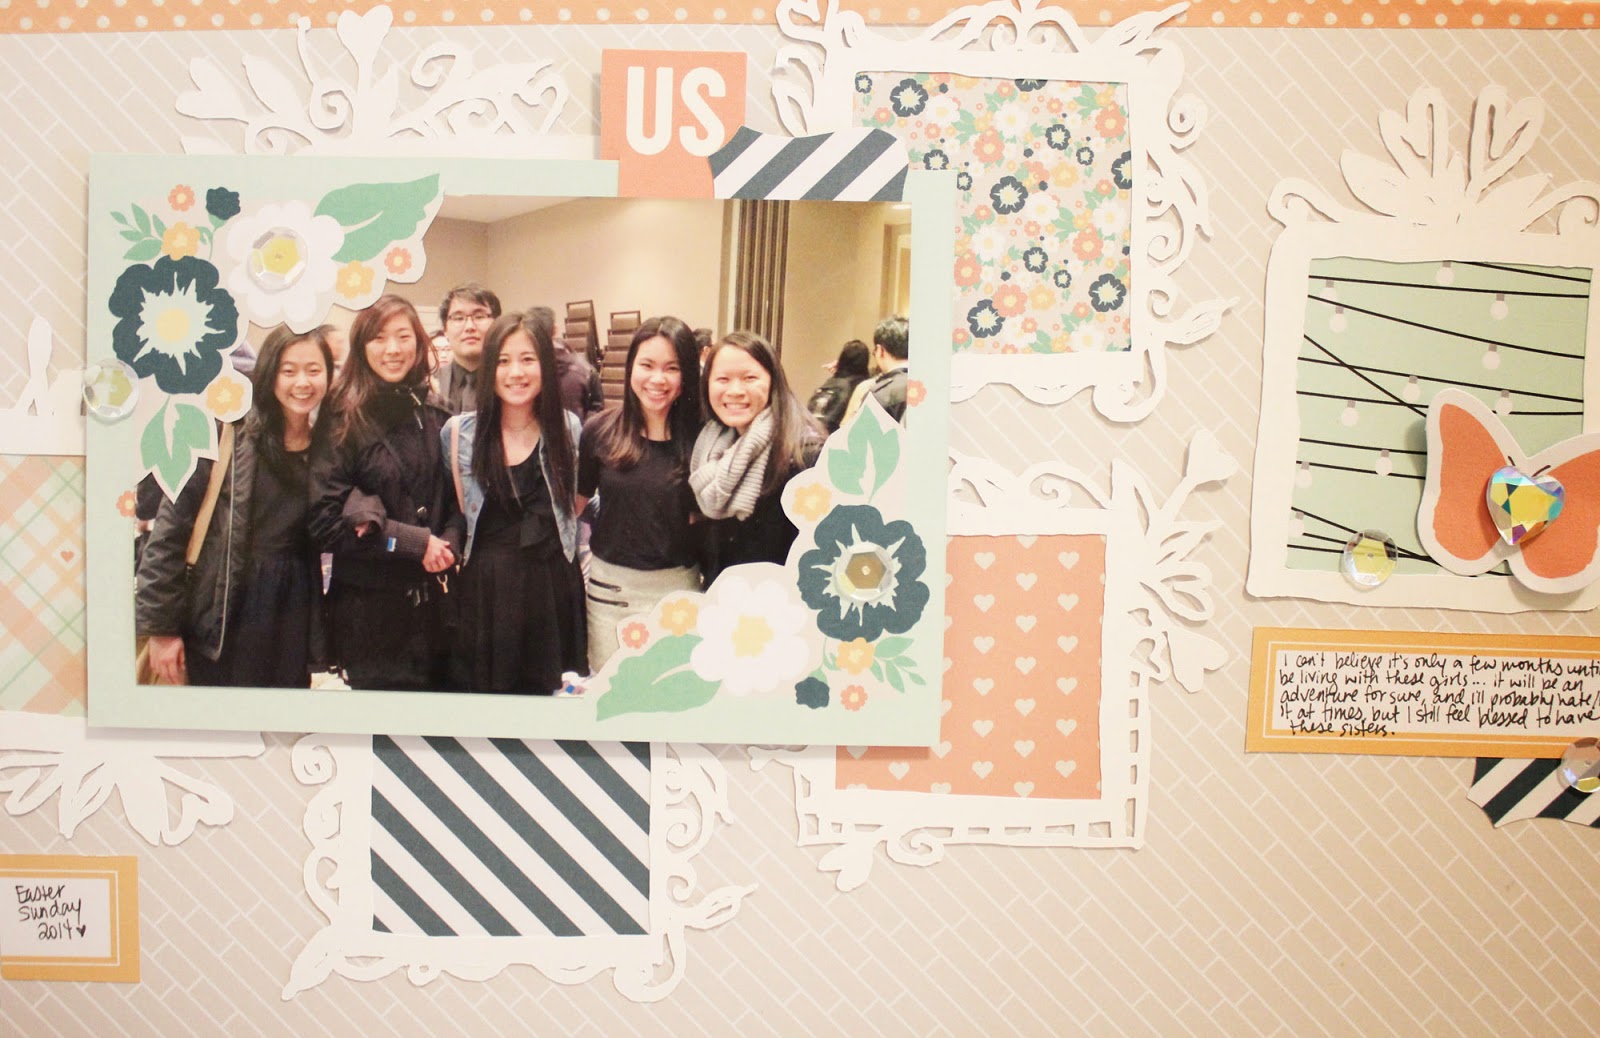
Then you can embellish each frame if you want. I left most of mine empty because I thought the patterned papers and flourishes on the frame were pretty enough :)

I also really love these apartment building motifs in this collection - perfect since this is a layout about my future roomies!!

There is no time other than college where I will be living with FIVE other girls, so I guess I should embrace it and definitely document it :)


Before I finish today, I also wanted to feature a very awesome lady. You might have seen my post a few weeks ago with a tutorial for a Father's Day card - well, Angela saw it on Instagram and actually decided to try it out herself - and added her own little twist to it!
I just LOVE that she added gold to the design - gold just really makes everything better, and it turned out gorgeous! Thanks so much for trying out the card, Angela!! :)

Make sure to visit her on Instagram (@angela.mcleod) to check out more of her awesome work!

Until next time, happy crafting!
xx

Hello there! Happy Tuesday :) Today I have a quick and easy step-by-step tutorial for you on how to make an interesting background using die cut frames.

To start with, choose a cut file or precut frames - I used these frames with pretty flourishes designed by Wilna Furstenberg for Two Peas in a Bucket. I love the feminine detail these frames have!


Next, choose some patterned papers that you'd like to fill the frames with. It helps to choose paper from a single collection here, so that it will all easily match. A 6x6 pad would be great, but I used this paper from Chickaniddy that has many different patterns that you can cut out. Since I don't do much pocket page scrapbooking anymore, this is a great way to use those cut aparts!


Matching each frame to a patterned paper, I cut a shape to go behind each frame and glued them down.
Then comes the assembling. I decided to do a partial background, but if you wanted to and had enough frames, I think this would be awesome covering a whole layout background.
Tip: Make sure you have parts of your frame going under your photo and even off the page. This creates the illusion that the frames continue behind the object and off the page, like a true background would.

Then you can embellish each frame if you want. I left most of mine empty because I thought the patterned papers and flourishes on the frame were pretty enough :)

I also really love these apartment building motifs in this collection - perfect since this is a layout about my future roomies!!

There is no time other than college where I will be living with FIVE other girls, so I guess I should embrace it and definitely document it :)


Before I finish today, I also wanted to feature a very awesome lady. You might have seen my post a few weeks ago with a tutorial for a Father's Day card - well, Angela saw it on Instagram and actually decided to try it out herself - and added her own little twist to it!
I just LOVE that she added gold to the design - gold just really makes everything better, and it turned out gorgeous! Thanks so much for trying out the card, Angela!! :)

Make sure to visit her on Instagram (@angela.mcleod) to check out more of her awesome work!

Until next time, happy crafting!
xx

Friday, April 18, 2014

I was recently inspired by an amazing video from Wilna Furstenburg (always a major source of inspiration for scrapbooking for me). In the video, she made her own mask, put modeling paste through it, and then spray painted it. The effect was absolutely breathtaking, and I wanted to replicate the same look for the layout I'm going to show you today.


Excuse the blurry photos, I just wanted to keep them a little more private ;)

So even though I loved the quote that Wilna chose, the song lyrics I chose are the basis of my whole story here, so I made my own cut file. I'll be the first to admit, my handwriting is not nearly as beautiful as Wilna's, but I did my best and I think it turned out alright, as the modeling paste is forgiving and doesn't cling to every little detail. :)


In Wilna's video, she sprayed gold spray paint over the modeling paste, and the effect was gorgeous. I don't have gold spray paint, though, so I recreated a similar look by pouring gold embossing powder over the wet paste and heating it up when the paste was dry. I also chose to only do this for part of the text rather than the whole thing so that it could double as my title.


Here's another look at the gold embossing - so shiny. :D


Even the white on white is so pretty... I will definitely be trying that out on another layout.


Some pretty gold embellishments to bring in more of the gold accent, as well as enamel dots - both store bought and home made!


Lastly, in a true Wilna spirit, I dropped big droplets of gold mist and black ink. I might have gotten a little carried away ;)

Modeling paste is quickly becoming one of my favorite tools to use, both in scrapbooking and cardmaking! I love that I can pair it with my Silhouette Cameo to cut my own stencils and come up with a unique and affordable result! To spread some of this happy love, I'm sharing the SVG file I created for the lyrics in the background. These lyrics really are great for any layout, especially a love-themed one!


Let me know what you think, or share any projects you make with it. :) Have fun, and see you soon!

I was recently inspired by an amazing video from Wilna Furstenburg (always a major source of inspiration for scrapbooking for me). In the video, she made her own mask, put modeling paste through it, and then spray painted it. The effect was absolutely breathtaking, and I wanted to replicate the same look for the layout I'm going to show you today.


Excuse the blurry photos, I just wanted to keep them a little more private ;)

So even though I loved the quote that Wilna chose, the song lyrics I chose are the basis of my whole story here, so I made my own cut file. I'll be the first to admit, my handwriting is not nearly as beautiful as Wilna's, but I did my best and I think it turned out alright, as the modeling paste is forgiving and doesn't cling to every little detail. :)


In Wilna's video, she sprayed gold spray paint over the modeling paste, and the effect was gorgeous. I don't have gold spray paint, though, so I recreated a similar look by pouring gold embossing powder over the wet paste and heating it up when the paste was dry. I also chose to only do this for part of the text rather than the whole thing so that it could double as my title.


Here's another look at the gold embossing - so shiny. :D


Even the white on white is so pretty... I will definitely be trying that out on another layout.


Some pretty gold embellishments to bring in more of the gold accent, as well as enamel dots - both store bought and home made!


Lastly, in a true Wilna spirit, I dropped big droplets of gold mist and black ink. I might have gotten a little carried away ;)

Modeling paste is quickly becoming one of my favorite tools to use, both in scrapbooking and cardmaking! I love that I can pair it with my Silhouette Cameo to cut my own stencils and come up with a unique and affordable result! To spread some of this happy love, I'm sharing the SVG file I created for the lyrics in the background. These lyrics really are great for any layout, especially a love-themed one!


Let me know what you think, or share any projects you make with it. :) Have fun, and see you soon!

Tuesday, April 8, 2014

Sometimes, being a student sucks. It's right about finals seasons right now, which means that my life and energy are slowly getting sucked up by school. BUT there are definitely times that I love being a student. Like... when there's Lobster Night at the dining hall, for example. Yeah, I really love being a student at times like that..


You might ask, "they have lobster at dining halls?" Well... they have lobster at THE BEST dining halls ;) Sorry, is that too much obnoxious school pride?


Lobster Night was kind of like a party... an amazingly delicious food party. So I thought banners were appropriate - they make the page seem like a party, right? Hehe.


Oh, how I love lobster. And beautiful pennants. I used papers from Crate Paper's The Pier collection.


Just look at all those fun layers! I popped some edges up with foam tape for more dimension.


So there it is, a quick layout about student life - which fits in perfectly with last week's Paperclipping Roundtable episode about "Scrapbooking Uni" :)

*****************************************************************************************************************************

And last off today, let's announce the winner from last week's giveaway!! I took a random number including both Instagram comments and blog comments, and got the number 32, which is:
@hodgepodge200 !! 


Congrats!! :) I contacted you on Instagram so that you can send me your address.

Thanks to everyone who participated - this was my first [relatively successful] giveaway haha, and it was fun! I'll be sure to do more in the future so make sure to keep posted :)

Sometimes, being a student sucks. It's right about finals seasons right now, which means that my life and energy are slowly getting sucked up by school. BUT there are definitely times that I love being a student. Like... when there's Lobster Night at the dining hall, for example. Yeah, I really love being a student at times like that..


You might ask, "they have lobster at dining halls?" Well... they have lobster at THE BEST dining halls ;) Sorry, is that too much obnoxious school pride?


Lobster Night was kind of like a party... an amazingly delicious food party. So I thought banners were appropriate - they make the page seem like a party, right? Hehe.


Oh, how I love lobster. And beautiful pennants. I used papers from Crate Paper's The Pier collection.


Just look at all those fun layers! I popped some edges up with foam tape for more dimension.


So there it is, a quick layout about student life - which fits in perfectly with last week's Paperclipping Roundtable episode about "Scrapbooking Uni" :)

*****************************************************************************************************************************

And last off today, let's announce the winner from last week's giveaway!! I took a random number including both Instagram comments and blog comments, and got the number 32, which is:
@hodgepodge200 !! 


Congrats!! :) I contacted you on Instagram so that you can send me your address.

Thanks to everyone who participated - this was my first [relatively successful] giveaway haha, and it was fun! I'll be sure to do more in the future so make sure to keep posted :)

Wednesday, March 19, 2014

Hello! Last week, I showed you a layout with a fun use of my circle punch. Today I have a fun tutorial for you today - it's for a really fun, dimensional border that you only need the same ONE punch for (and a bunch of scraps). Here's a little look at what it will look like at the end:


First off, grab a circle punch - I used a 1" punch, but you can use any size up to about 2". Then, take a bunch of paper scraps. Make sure they are double sided, because a little of both sides will show up in the end. It might be a good idea to choose one 6x6 pad to do this with, just so that everything coordinates in the end. But really, it's up to you! Punch away until you have a nice sized pile that looks like this.


This next step is really important, and gives the border its unique character, so pay attention! You will need a very sturdy piece of cardstock, or maybe even some thin chipboard. Trim a short strip that is the length of approximately half the width of your circles. In my case, it was 1/2 inch. Place this guide in the middle of a circle and then fold the sides over. Here's what it looks like in action:


Do this with all the circles. Make sure you alternate which pattern shows up as the base or the flaps if you have duplicate circles from the same piece of paper. Then the next step is to assemble!

Take a long scrap of paper that you will lay the pieces on. The fastest way to attach them all is to place long strips of adhesive along the edge of the paper, so you don't have to place adhesive on each piece one at a time. Hope that makes sense!


You simply have to place the circles side by side. However, when you get to the second row, you can alternate which circle overlaps the other for even more variation. You can add more rows if you want, but I just did two. Make the strip as long as you can until you run out of circles. You can always trim your finished strip into smaller pieces, which I did later on.


Trim off the scrap paper from the bottom of your strip, and then it's ready to add to a layout!


I kept this layout pretty simple, because I think the circle border really adds a lot already.


So there you have it, a fun way to put a basic punch to use! I hope this inspires you to take out your simple circle punch and do something fun with it!!

P.S. I recently discovered an AMAZING way to make DIY enamel dots!!! I'm working on a tutorial for you all now, and will have it up soon! I'm thinking of doing a little giveaway of them, too - let me know your thoughts on this in the comments - would you like a giveaway, does DIY enamel dots sound interesting to you?? ;)

Hello! Last week, I showed you a layout with a fun use of my circle punch. Today I have a fun tutorial for you today - it's for a really fun, dimensional border that you only need the same ONE punch for (and a bunch of scraps). Here's a little look at what it will look like at the end:


First off, grab a circle punch - I used a 1" punch, but you can use any size up to about 2". Then, take a bunch of paper scraps. Make sure they are double sided, because a little of both sides will show up in the end. It might be a good idea to choose one 6x6 pad to do this with, just so that everything coordinates in the end. But really, it's up to you! Punch away until you have a nice sized pile that looks like this.


This next step is really important, and gives the border its unique character, so pay attention! You will need a very sturdy piece of cardstock, or maybe even some thin chipboard. Trim a short strip that is the length of approximately half the width of your circles. In my case, it was 1/2 inch. Place this guide in the middle of a circle and then fold the sides over. Here's what it looks like in action:


Do this with all the circles. Make sure you alternate which pattern shows up as the base or the flaps if you have duplicate circles from the same piece of paper. Then the next step is to assemble!

Take a long scrap of paper that you will lay the pieces on. The fastest way to attach them all is to place long strips of adhesive along the edge of the paper, so you don't have to place adhesive on each piece one at a time. Hope that makes sense!


You simply have to place the circles side by side. However, when you get to the second row, you can alternate which circle overlaps the other for even more variation. You can add more rows if you want, but I just did two. Make the strip as long as you can until you run out of circles. You can always trim your finished strip into smaller pieces, which I did later on.


Trim off the scrap paper from the bottom of your strip, and then it's ready to add to a layout!


I kept this layout pretty simple, because I think the circle border really adds a lot already.


So there you have it, a fun way to put a basic punch to use! I hope this inspires you to take out your simple circle punch and do something fun with it!!

P.S. I recently discovered an AMAZING way to make DIY enamel dots!!! I'm working on a tutorial for you all now, and will have it up soon! I'm thinking of doing a little giveaway of them, too - let me know your thoughts on this in the comments - would you like a giveaway, does DIY enamel dots sound interesting to you?? ;)

Monday, March 10, 2014

The layout I'm going to share with you is really special to me, not just because I feel the end result is beautiful, but because the story behind it is beyond meaningful. I think I can say with relative certainty that this layout documents a point in my life that I will look back on and say, "Wow. That was when my life changed."

It all started with a Symphony Church retreat... I honestly didn't expect much of it. Sure, I knew I would learn a few things, and it would make me feel great for a weekend, just like all other retreats... but change my life? Nope, because I thought everything in my life was just jolly and nothing needed changing.


I was so wrong and I probably would not have realized it, except for the fact that God spoke to me through other people that weekend and convicted me of things in my life that, deep down, I knew needed to change, but I simply did not want to. For those who don't believe in God, this might sound like craziness. It might seem ridiculous to change one's life based on some feelings you get at a secluded retreat. But let me tell you, there is nothing fake or "emotional" about someone you have never met speaking truth about your life as if they knew you... because God had told them all about you already. Something like that is so real and, at the same time, supernatural. Honestly, it freaked me out a bit. But it was also exactly what I needed - that push in the right direction.


So yeah, that was a bit of background about my story... now onto the scrapbooking! I used what I call the "punch and piece" method, inspired by the always-amazing Paige Evans. All you have to do is punch a whole bunch of 1" circles from pretty papers (I used mostly the Maggie Holmes Flea Market 6x6 paper pad) and piece them together in whatever way you want! I tried something like my last layout, where the photo is pushed off to the side (rather than in the center, like I usually do) - but it's still the highlight of the page because of the amazing border of circles around it! Just check out those wonderful layers...


I'm just really having fun playing with this kind of format, because you have so much room to play on the rest of the page, while still letting that beautiful background paper show! There's also a lot of room for journaling, which of course I needed for my story.


I've been getting a lot of use out of my circle punch lately, and I'll have a really cool tutorial up next week where I make a fun, dimensional border out of this one punch!


A turning point, captured.

Thanks for stopping by and reading my story today! Hope you have a great week!! :)

xx Michelle

The layout I'm going to share with you is really special to me, not just because I feel the end result is beautiful, but because the story behind it is beyond meaningful. I think I can say with relative certainty that this layout documents a point in my life that I will look back on and say, "Wow. That was when my life changed."

It all started with a Symphony Church retreat... I honestly didn't expect much of it. Sure, I knew I would learn a few things, and it would make me feel great for a weekend, just like all other retreats... but change my life? Nope, because I thought everything in my life was just jolly and nothing needed changing.


I was so wrong and I probably would not have realized it, except for the fact that God spoke to me through other people that weekend and convicted me of things in my life that, deep down, I knew needed to change, but I simply did not want to. For those who don't believe in God, this might sound like craziness. It might seem ridiculous to change one's life based on some feelings you get at a secluded retreat. But let me tell you, there is nothing fake or "emotional" about someone you have never met speaking truth about your life as if they knew you... because God had told them all about you already. Something like that is so real and, at the same time, supernatural. Honestly, it freaked me out a bit. But it was also exactly what I needed - that push in the right direction.


So yeah, that was a bit of background about my story... now onto the scrapbooking! I used what I call the "punch and piece" method, inspired by the always-amazing Paige Evans. All you have to do is punch a whole bunch of 1" circles from pretty papers (I used mostly the Maggie Holmes Flea Market 6x6 paper pad) and piece them together in whatever way you want! I tried something like my last layout, where the photo is pushed off to the side (rather than in the center, like I usually do) - but it's still the highlight of the page because of the amazing border of circles around it! Just check out those wonderful layers...


I'm just really having fun playing with this kind of format, because you have so much room to play on the rest of the page, while still letting that beautiful background paper show! There's also a lot of room for journaling, which of course I needed for my story.


I've been getting a lot of use out of my circle punch lately, and I'll have a really cool tutorial up next week where I make a fun, dimensional border out of this one punch!


A turning point, captured.

Thanks for stopping by and reading my story today! Hope you have a great week!! :)

xx Michelle

Tuesday, March 4, 2014

WOO, I'm on Spring Break!! Except... wait, it's 15 degrees outside. Hahah, so much for "Spring!" I'm not the only one just hoping and dreaming spring and summer will come faster, am I?? This winter has been brutal, and there has been just SO much snow. Enough to make snow mountains, literally.


Anyone who knows me even a little bit knows that I am so NOT a fan of winter or the cold... which means I tend to not take as many pictures as in the summer, and therefore don't scrapbook winter very much. But I think this winter just had to be documented, to have some sort of record of how bad it was - that way, I can look back on it in the future and think, "Well if I got through that, I can get through any kind of weather, right?" Hehe :)


This layout was kind of an adventure to make, because I used a very different layout that I normally use - the picture is in the corner and there are a bunch of elements around the edges, but not much in the middle. It's loosely based on a layout by Lisa Truesdell (second layout down)


This approach was a bit challenging at first, but after a bit, I really got into and love how it came out!!


It's also a great way to use up scraps of paper - always a good thing!

Don't you love when you try something new and different and it just turns out exactly how you wanted it to? Because let's be honest, sometimes it just utterly fails, haha! Next week I'll be sharing another layout with a similar approach, so stay tuned!! 

Stay warm amidst the snow mountains ;)

WOO, I'm on Spring Break!! Except... wait, it's 15 degrees outside. Hahah, so much for "Spring!" I'm not the only one just hoping and dreaming spring and summer will come faster, am I?? This winter has been brutal, and there has been just SO much snow. Enough to make snow mountains, literally.


Anyone who knows me even a little bit knows that I am so NOT a fan of winter or the cold... which means I tend to not take as many pictures as in the summer, and therefore don't scrapbook winter very much. But I think this winter just had to be documented, to have some sort of record of how bad it was - that way, I can look back on it in the future and think, "Well if I got through that, I can get through any kind of weather, right?" Hehe :)


This layout was kind of an adventure to make, because I used a very different layout that I normally use - the picture is in the corner and there are a bunch of elements around the edges, but not much in the middle. It's loosely based on a layout by Lisa Truesdell (second layout down)


This approach was a bit challenging at first, but after a bit, I really got into and love how it came out!!


It's also a great way to use up scraps of paper - always a good thing!

Don't you love when you try something new and different and it just turns out exactly how you wanted it to? Because let's be honest, sometimes it just utterly fails, haha! Next week I'll be sharing another layout with a similar approach, so stay tuned!! 

Stay warm amidst the snow mountains ;)

Tuesday, February 18, 2014

This past January was the mark of our two year anniversary! It's amazing how fast the years have flown by, but also how much it has changed the both of us in this time.

I just want to share a quick layout with you today that I made to remember how we celebrated - with chocolate and good food, of course!!


Sometimes I have issues with hoarding the beautiful products that seem almost TOO pretty to use, but I made sure not to do that on this page, since it is extra special and nothing is considered "wasted" on it!


I especially love, love, LOVE that beautiful floral paper from the new Maggie Holmes collection, Style board.

I love this other paper, too, but it turned out to be a bit to busy for my taste for the background. My easy solution was to paint some thinned white acrylic paint, and that made it perfect for me!


I used a lot of embellishments from various manufacturers on this page, but the centerpiece was this die cut flourish that I cut on my Cameo, watercolored, and then added the title and some enamel dots - those things work for ANYthing!

So there's a really quick post today - thanks for stopping by and looking!

This past January was the mark of our two year anniversary! It's amazing how fast the years have flown by, but also how much it has changed the both of us in this time.

I just want to share a quick layout with you today that I made to remember how we celebrated - with chocolate and good food, of course!!


Sometimes I have issues with hoarding the beautiful products that seem almost TOO pretty to use, but I made sure not to do that on this page, since it is extra special and nothing is considered "wasted" on it!


I especially love, love, LOVE that beautiful floral paper from the new Maggie Holmes collection, Style board.

I love this other paper, too, but it turned out to be a bit to busy for my taste for the background. My easy solution was to paint some thinned white acrylic paint, and that made it perfect for me!


I used a lot of embellishments from various manufacturers on this page, but the centerpiece was this die cut flourish that I cut on my Cameo, watercolored, and then added the title and some enamel dots - those things work for ANYthing!

So there's a really quick post today - thanks for stopping by and looking!

Thursday, January 30, 2014

Hey everyone! I'm here to share a really cool tutorial today about a fun technique: hand stitching a big element! This is great for adding interest to a background (like I did for this project), but I think it would also be awesome to do the same thing to cut out and use as an awesome handmade embellishment. It takes a little time, but the effect is just stunning. Let's get started!

So the first thing I did for my layout was a bit of stamping with a border stamp from Paper Smooches. It adds a little texture to the background, but honestly I just really wanted to open up the brand new set of stamps I got and put them to use, hehe ;)


Then I sketched a big element - I used an ampersand, because it fits in with my title (Roots & Branches), but you can really choose any shape you want that isn't too intricate. Then I poked holes along the outlines about a centimeter apart - you don't have to be super accurate, because it will still look amazing!

The next step isn't too hard, but definitely takes time. Plop yourself in front of some nice scrapbooking process videos, or your favorite TV show until you come up with something like this:


So all I did here was go over the whole background of the shape with a simple backstitch. After that was done, I went back through random holes to make criss crosses inside the shape. This gives it such an interesting texture and dimension on the page! And notice how I left some gaps? Well, I already knew where I was going to put my photos, which were going to cover up a big part of the stitching. Since it is so time consuming, I didn't want to put too much work into a part that I knew would be covered up.

After that was done, I applied my title by cutting it out of cardstock on my Silhouette Cameo, and then using the negative as a stencil. I mixed some gesso with paint until I came up with a color I liked, and it looked like this:

You can see I also added a spritz of yellow spray mist to give a little home in the background for a die cut butterfly. I did this in three places on the layout.

After adding a bunch of stickers and die cuts, I finished my layout!


I mixed some spray mist with water to make those droplets across the page. I might have gotten carried away in some places, ha!


I love how these die cut butterflies look against the yellow mist. It really makes them stand out, since the background is white.


Thanks for stopping by today! I hope you give hand stitching a try on your next projects, because you really get some amazing effects with it!!

Hey everyone! I'm here to share a really cool tutorial today about a fun technique: hand stitching a big element! This is great for adding interest to a background (like I did for this project), but I think it would also be awesome to do the same thing to cut out and use as an awesome handmade embellishment. It takes a little time, but the effect is just stunning. Let's get started!

So the first thing I did for my layout was a bit of stamping with a border stamp from Paper Smooches. It adds a little texture to the background, but honestly I just really wanted to open up the brand new set of stamps I got and put them to use, hehe ;)


Then I sketched a big element - I used an ampersand, because it fits in with my title (Roots & Branches), but you can really choose any shape you want that isn't too intricate. Then I poked holes along the outlines about a centimeter apart - you don't have to be super accurate, because it will still look amazing!

The next step isn't too hard, but definitely takes time. Plop yourself in front of some nice scrapbooking process videos, or your favorite TV show until you come up with something like this:


So all I did here was go over the whole background of the shape with a simple backstitch. After that was done, I went back through random holes to make criss crosses inside the shape. This gives it such an interesting texture and dimension on the page! And notice how I left some gaps? Well, I already knew where I was going to put my photos, which were going to cover up a big part of the stitching. Since it is so time consuming, I didn't want to put too much work into a part that I knew would be covered up.

After that was done, I applied my title by cutting it out of cardstock on my Silhouette Cameo, and then using the negative as a stencil. I mixed some gesso with paint until I came up with a color I liked, and it looked like this:

You can see I also added a spritz of yellow spray mist to give a little home in the background for a die cut butterfly. I did this in three places on the layout.

After adding a bunch of stickers and die cuts, I finished my layout!


I mixed some spray mist with water to make those droplets across the page. I might have gotten carried away in some places, ha!


I love how these die cut butterflies look against the yellow mist. It really makes them stand out, since the background is white.


Thanks for stopping by today! I hope you give hand stitching a try on your next projects, because you really get some amazing effects with it!!

Tuesday, January 7, 2014

Last month, to celebrate the end of the semester, I went on a girl's night out with some friends to see the Nutcracker ballet. I wasn't sure how much I'd like it, with there being no talking and all, but it was really fun and quite a show! I was in awe of the dancers, especially since dancing is the one thing I wish most I could do and just can't.... at all, haha ;)


All it took was a new sketch up at Shimelle.com to get me inspired to scrap this awesome night! Here's a look at the sketch if you want to play along:


As you can see, I rotated the sketch to fit with my photos, and also added a little strip at the bottom because it felt too empty for me.


I finally worked up the courage to cut into this beautiful Maggie Holmes vellum. It's just so, so beautiful!! But that means it belongs on some pages instead of sitting in a box ;)


After the show, we grabbed dessert at Max Brenner's. If you have a Max Brenner's near you, and have never been, you MUST go. It was so heavenly and I dreamt of chocolate for the whole week after. And might tonight, too.... Mmmmm.


Note to self: Go on more awesome girls nights. Hehe :)

Things might be a bit quiet here for the next few months... the school semester just started two days ago for me, and it's already getting intense!! Wish me luck please <3

Hope you had a great start to your week, and thanks for stopping by!!

Last month, to celebrate the end of the semester, I went on a girl's night out with some friends to see the Nutcracker ballet. I wasn't sure how much I'd like it, with there being no talking and all, but it was really fun and quite a show! I was in awe of the dancers, especially since dancing is the one thing I wish most I could do and just can't.... at all, haha ;)


All it took was a new sketch up at Shimelle.com to get me inspired to scrap this awesome night! Here's a look at the sketch if you want to play along:


As you can see, I rotated the sketch to fit with my photos, and also added a little strip at the bottom because it felt too empty for me.


I finally worked up the courage to cut into this beautiful Maggie Holmes vellum. It's just so, so beautiful!! But that means it belongs on some pages instead of sitting in a box ;)


After the show, we grabbed dessert at Max Brenner's. If you have a Max Brenner's near you, and have never been, you MUST go. It was so heavenly and I dreamt of chocolate for the whole week after. And might tonight, too.... Mmmmm.


Note to self: Go on more awesome girls nights. Hehe :)

Things might be a bit quiet here for the next few months... the school semester just started two days ago for me, and it's already getting intense!! Wish me luck please <3

Hope you had a great start to your week, and thanks for stopping by!!